Established in 1949. The Society exists to further the skills, interests and enjoyment of all types of photography. It provides a forum for the exchange of information and ideas on photographic techniques, and encourages an appreciation of the artistic and creative side of photography. Members of all levels of achievement are encouraged to show and discuss their work. No photographic knowledge required - just enjoy viewing photographs and the night out!

Monday 29 December 2008

How To Handle Cold Weather Photography


Cold weather presents a few unique challenges to digital photographers.  In this post, Peter Carey offers some suggestions to keep you photographing when the mercury drops.

cold weather photography - Copyright Lachlan HardyWhen the weather outside turns cold, there are a few precautions every digital photographer should take.

First, give your camera time to acclimate!

This one is very important and it's a two way street.  If you're heading outside from a nice warm house, or if you're coming back in from a shoot out in the cold, give your camera lens time to adjust to the temperature change.  Going either direction will fog up your lens and viewfinder.  Leave your lens cap on when going either direction and give your camera plenty of time to adjust to the temps.  The amount of time depends on the the difference in temperatures from inside to outside.  The larger the difference, the more time you should allow.  15 minutes is usually fine but more may be needed depending on how humid each environment is.  You want a slow, gradual change so if you can, leave your camera in a camera bag as it gets used to the change.  While this may take a bit longer, it does help ensure condensation won't become a problem.

Next, you'll want to protect your batteries.

Besides the lens of your camera (even worse, your sensor) getting fogged over, batteries are the lifeline for digital photography.  Unlike traditional film (with another set of cold weather challenges), digital cameras obviously rely on working batteries.  The problem is cold saps batteries of energy even when they aren't in the camera.  Carry spare batteries in pant pockets where they are close to your body.  The warmer the battery, the better it performs.  Even when your camera indicates a battery is dead, warming it up in a pocket (especially one with a hand warmer!) can bring it back to life for a few dozen more shots.  Get used to rotating batteries in this manner and you'll be able to stay out shooting longer.

cold weather photography - copyright Karen Carey

Let's not forget your hands!

Once your camera has adapted to the cold, holding it for long periods of time can cause frost bitten fingers.  Just having your hands exposed to subfreezing temperatures for more than a few minutes can make your digits fumble and feel quite painful.  Obviously gloves are a requirement for outdoor photography, but what works well?  You'll need both the warmth of a puffy winter mitten but the dexterity and tactile feel of a thin, thin layer.  Enter the Mountain Hardwear Power Stretch Glove!  I've found these gloves to provide the best warmth while still maintaining all the feel of the camera I need.  They keep the wind out and while they are no extreme winter glove, they get the job done.

Lastly, keep your camera out of the elements

While the snow may be falling and seem so much better than a rainy day behind the lens, be aware that snow can cause just as much damage.  Carry a soft, water absorbent cloth to help dry off your camera while out and about.  Also consider investing in a rain hood for your camera if it's a DSLR, which allows you to keep shooting in the heaviest of downpours.  In a pinch, wrapping a towel around your camera will keep the snow off.

There's no reason to let the cold weather keep you inside or away from your camera.  With a little preparation you can ensure great photo opportunities don't pass you by this winter!

Are you looking for daily photographic inspiration?  Peter hosts a Photo Of The Day RSS/Atom/email feed on his site, The Carey Adventures.  Get inspiring photos from the world of travel and adventure delivered daily to your mailbox!


Things you can do from here:


--
Alastair Montgomery
Email - alastair@montgomery.me.uk

Pictures - http://www.montgomery.me.uk
Buy Stuff - http://tinyurl.com/drj7r

Tech Blog - http://tinyurl.com/9mqoc
Photo Blog - http://tinyurl.com/ytkgu4
Jokes Blog - http://tinyurl.com/27437j

Thursday 18 December 2008

Polaroid: R.I.P. in 14 Days :(

Bloglines user SickLittleMonkey (doodle.m@gmail.com) has sent this item to you.


Photojojo
The most kick-ass photo tips, DIY projects, and gear

Polaroid: R.I.P. in 14 Days :(

By kelly on Tips

Orders placed in the Photojojo Shop today will arrive for Christmas
In stock items to the U.S. only, choose flat-rate $6 Priority Mail shipping at checkout
(Or choose 2-Day shipping by 12/21 or Next Day by 12/22)
Poladroid pictures

Photojojo Store goodies have been on Boing Boing, Wired, Gizmodo, and Digg in the last two weeks!

Best-sellingstocking stuffers that will ship in time for Christmas!

More photo goodies that will
ship in time for Christmas!

and more…

Well gang, we fought the good fight, but it's official: Polaroid isn't making any more film after December 31st, 2008.

Sad though we are, we've found a few bits of good news scattered amid the wreckage.

1) The New Instant Camera
Fuji's instant camera, the Instax, is now available in the United States. The photos are rectangular instead of the old familiar square format, but it's the next-best-thing to our beloved Polaroid cameras.

Have a look at the Flickr Instax pool to see what the photos look like.

2) There's Still Some Film Left
Unsaleable, our favorite source for Polaroid goodness, has morphed into Polapremium. You can still buy film there, sorted by camera type or film type, along with books, accessories and stuff like that. (The name's no lie: it's quite pricey now that supplies are limited.)

Polaroid no longer sells film on its website, but it lists sources including Calumet, Amazon, and B&H.

3) Fuji Makes Substitutes
Fuji makes versions of Type 100 and 4×5 Polaroid film. That means if you use a medium-format Polaroid back, a Polaroid pinhole or Holga camera, or a 4×5 view camera, you can still get film.

4) New Zink Technology
Instead of making film, Polaroid's branching out with the portable digital PoGo printer. We were a little disappointed when we tried it, because it's basically just a tiny printer. It doesn't feel the same as having instant photos magically pop out of your camera. Sigh.

We have higher hopes for the TOMY xiao, which combines the camera and printer in one, but so far that's only available in Asia.

5) You Can Take Action
If you refuse to go down without a fight, get an action pack from Save Polaroid. It includes pre-printed postcards to send to the powers-that-be at Polaroid. It's worth a shot, right?

6) There's Still Time to Play
While you can still scrounge up some film, you can still mess around with it. Try double exposures or manipulating the emulsion, especially if the film's already expired. What have you got to lose?

7) There's Always Poladroid
If all else fails and there is no more film, at least there's Poladroid. It's a free application that's as close to real thing as it gets. You can drag & drop your photos into Poladroid to make them look like Polaroids. You can even shake the picture while it develops. Aaaahhh, that's nice.

Bye Polaroid! We still love you! Please sell the 600 and Type 80 rights to another manufacturer so we can have them back! Pretty pretty please?

Save Polaroid
News, information, and hope for the lovelorn Polaroid fan.

p.s. We've teamed up with our superpals at Vimeo for a contest for the best Stop-Motion Video! Three winners get gift certificates to the Photojojo Store, and 1st place gets their video printed in our upcoming book! Go read all the details and enter. (Already on Vimeo? Just tag your video "PhotojojoBook" to enter.)

p.p.s. Check out some fun Photojojo photo projects in December's issue of Macworld magazine!


 Link to this | Filed under Tips.

Comments

Thursday 11 December 2008

Travel and transportation Competition


Ripon City Photographic Society Main Page Google Groups
Gordon Quinn, our judge for the competition gently chastised us for wandering from the title suject. He suggested various cropping methods to bring our photographs up to more acceptable standards.
But the ladies took the lead with 8 out of the 13 placings going to them. But the queen for the night was undoutably shirley Wildsmith with no less than 5 placements.
Print winners...1, Denise Carrigan, 2, Paul Bullock, 3 Ian Whittaker, Highly commended, Tim Nichols,Ian Whittaker, Shirley Wildsmith, And again Shirley Wildsmith.
Digital winners...1 Shirley Wildsmith, 2 Angie Willis 3 Shirley again.. higly commended...Paul Bullock, Shirley again WOW Cathryn carter.

Tuesday 9 December 2008

15th December Meeting, Christmas Party Night

15th December Meeting

Come along to our Christmas party, food and fun quiz on the cards.

Meeting 15th December at 7:30pm at the HUGH RIPLEY HALL RIPON (Upstairs)

Ripon City Photographic Society Main Page Google Groups

Tuesday 2 December 2008

Guidelines to help photographers

Revised stop and search policy is released - The National Policing Improvement Agency (NPIA) have released the revised practise advice on stop and search policies.

NPIA logoThe guidelines which may stop some of the problems photographers have had when photographing in the street may be put to an end as the NPIA have finally released their new policy.

"The guidance has been circulated to forces for final comment. As with all guidance, following consultation, it will require formal endorsement by ACPO (Association of Chief Police Officers), when it meets in the next couple of weeks," said Peter Mandich the NPIA's Press and PR Manager.

The policy clearly states that: "The Terrorism Act 2000 does not prohibit people from taking photographs or digital images in an area where an authority under section 44 is in place. Officers should not prevent people taking photographs unless they are in an area where photography is prevented by other legislation."

It does say if a police officer suspects that the photographs are being taken as part of hostile terrorist reconnaissance, a search under section 43 of the Terrorism Act 2000 or an arrest should be considered. The document then goes onto explain in detail how this should be carried out.

The policy can be downloaded from the NPIA's website and the section relevant to photographers is section 2.8.


Ripon City Photographic Society Main Page Google Groups

Digital Photography Competition - Round Five

Enter this external online competition and with lots of free stuff.


TrustedReviews Logo   TrustedReviews Site-wide Feed
The UKs Premier Source for Technology News and Reviews

Digital Photography Competition – Round Five

By Cliff Smith

   Enter our monthly photo competition and win prizes from Adobe, SanDisk and ATP, worth over £1,000!
Turn Ho-Hum Color into WOW! with Photoshop


Copy of Photography How-To
Various Photography sources, filtered by the phrase "How to"

Turn Ho-Hum Color into WOW! with Photoshop

In Post Production Tips


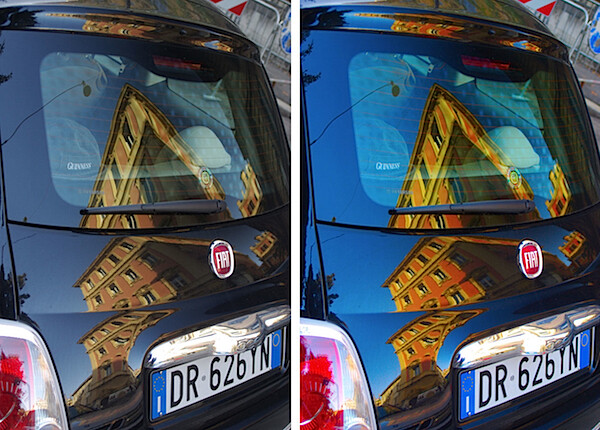
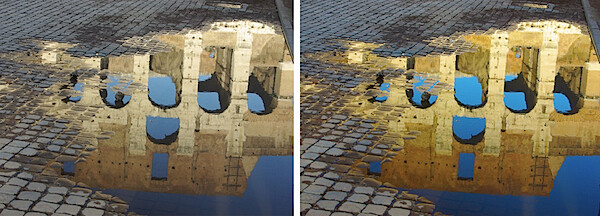
Guest blogger Helen Bradley (fromwww.projectwoman.com) shows how to use the LAB color mode in Photoshop to give a punch to your photos.

I like to see lovely saturated color in my photos but sometimes the color I capture just doesn't do justice to the subject and it isn't what I remember the scene looked like. Boosting the color can turn a lackluster image into one that totally rocks. So, if you find that the color in your photos is lacking, here's what I do to make it better. The process is ridiculously simple, it requires no selections to be made, and it can be recorded as a simple action. It's my kind of fix – quick, easy and very powerful.

before-after3.jpg

A word about LAB

The fix uses the LAB color space. This is not an often used color space and it isn't available in most other programs so you won't be able to mimic this effect in, for example, Photoshop Elements. However, LAB has been around in Photoshop for years.

In the RGB color space you work with the red, green and blue channels and in CMYK you work with cyan, magenta, yellow and black channels. In LAB you have three channels; L, a and b. The L channel is the lightness channel and, if you adjust it you adjust only the lightness in the image and you don't change any of the color in the image. This sets Lab apart from RGB and CMYK as color and lightness are separate in LAB where they aren't in the other modes.

In Lab the two color channels are a and b. The a channel contains color information for the green and magenta in the image. The b channel manages the blue and yellow colors in the image. If you were to look at these channels they would look very light because they contain only color information and no lightness data.

By separating lightness from color as LAB does you can make adjustments that would be difficult or time consuming to do in any other color space. However, that said, I think this fix works best on animals, landscapes and streetscapes – but not on close ups of people. On people it tends to destroy the natural skin tones.

How to fix in Lab

To see this LAB fix at work pick an image that has color in it but which you think could use a color boost.

Step 1

step1.jpg
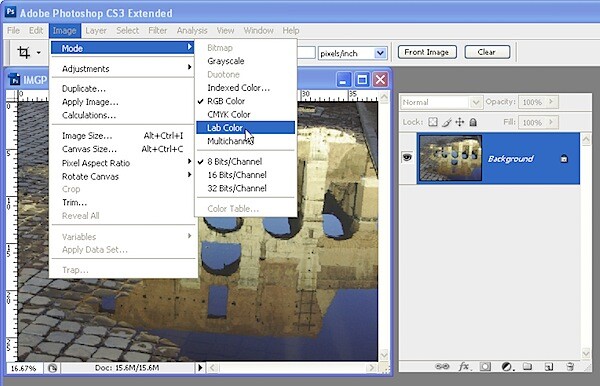
With the flattened image open in Photoshop, choose Image > Mode > LAB Color. If you're working on a flattened image you won't see anything except LAB/8 appearing in the title bar of the image.

Step 2

step2.jpg

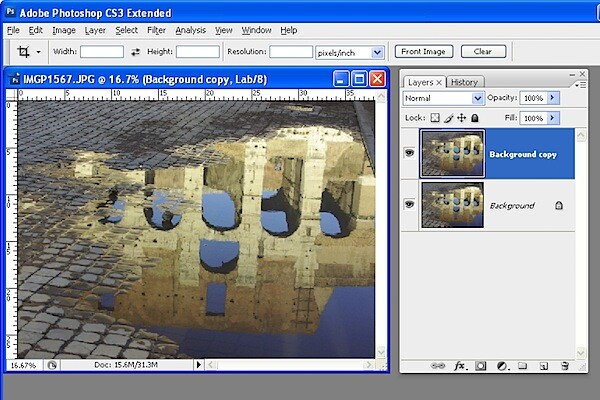
Duplicate the background layer of the image by right clicking it and choose Duplicate Layer. You'll make your adjustments on this duplicate of the background layer so that you can blend them into the background layer later on.

Step 3

step3.jpg

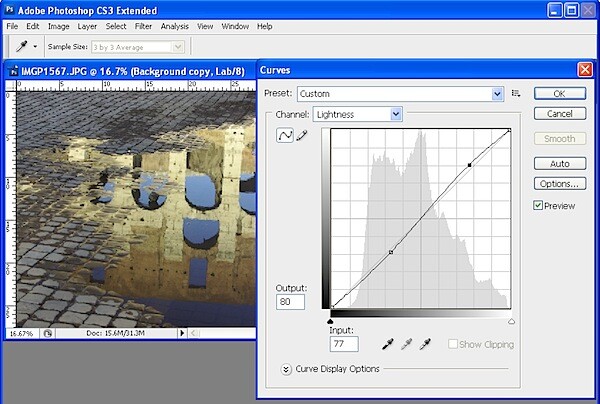
Choose Image > Adjustments > Curves to apply the curves adjustment to the duplicate background layer. Don't use an adjustment layer as you'll only have to flatten it on returning to RGB anyway.

In the curves dialog, the L channel is visible on the screen. This channel that contains only lightness and darkness values so that you can drag on the curve to adjust this if desired.

Step 4

step4.jpg

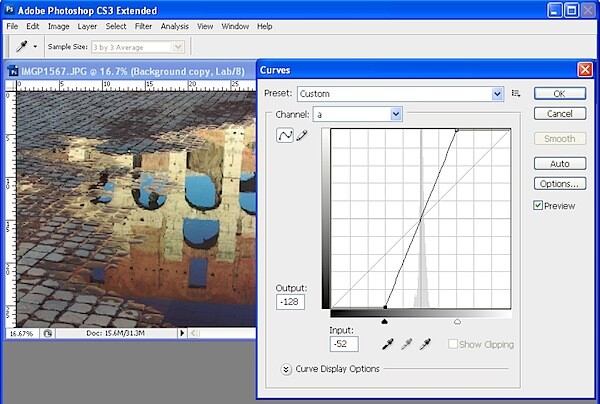
Select the a channel – this is the magenta/green channel. In a standard Photoshop setup green is on the left and magenta is on the right. Drag the bottom edge of the curve inwards 2-3 squares. Then drag the top edge of the curve inwards the same number of squares. It doesn't matter how many squares you drag but you must drag the same number on either end so the curve line crosses the middle of the grid – this stops you from inadvertently inducing a color cast into the image.

Step 5

step5.jpg

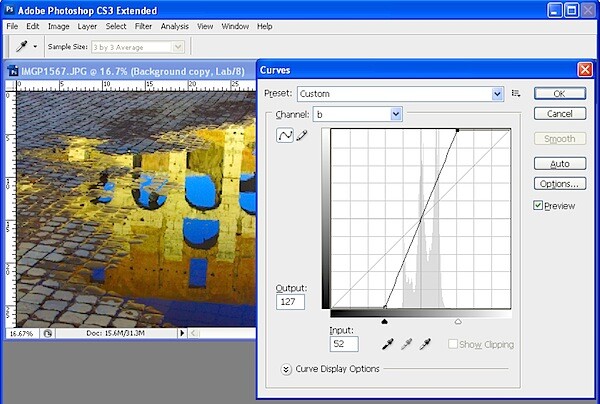
When you've adjusted the a curve, repeat the process with the b curve. At this point the image is probably looking very scary indeed. However, you need to make the adjustment strong enough that you get too much color rather than too little at this stage. Click Ok to apply the curve to the top image layer.

Step 6

step6.jpg

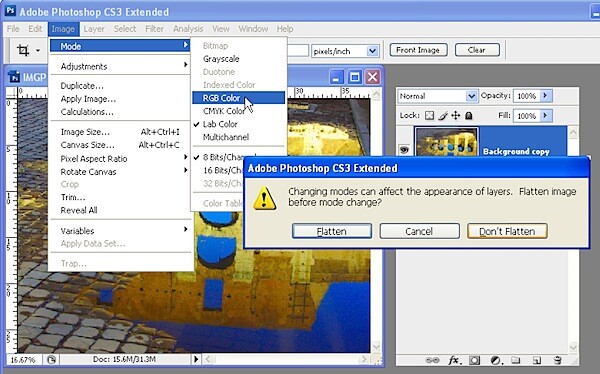
To return to RGB mode choose Image > Mode > RGB Color. When prompted, select the Don't Flatten option. This is critical because you want both layers intact back in RGB mode.

Step 7

step7.jpg

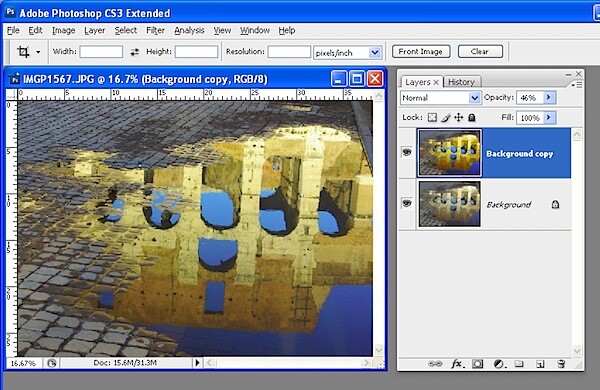
Now drag the Opacity slider for the top layer back to 0 so you see the original image and slowly walk the slider back up until you get the amount of color you want in your image. When you're done, save the result.

Once you've done this a couple of times, you'll appreciate how much of a boost in color you can get and how fast you can do it. Record the fix as an action and you can do it in one click and then just adjust the opacity to suit.

In some cases altering the blend mode of the top layer can yield pleasing results. The blend modes in the Overlay, Soft Light, Hard Light, Vivid Light, Linear Light and Pin Light grouping in the Blend Mode list give the best results. You can also duplicate the top layer and apply different blend modes to each copy to bring out different areas of the image.

So, if you want to produce eye-wateringly beautiful color in your photos, chances are that a Lab color fix like this is just what you need.

The images below show the original image on the left and the LAB color fix applied to it in the image on the right. No adjustments other than working LAB and blending the resulting layers have been used on the right hand versions.

before-after4.jpgbefore-after2.jpgbefore-after3.jpgbefore-after5.jpgbefore-after1.jpg

Post Script: To learn more about LAB color mode and the fixes that you can perform using it, look no further than Dan Margulis' book— Photoshop LAB Color: The Canyon Conundrum and Other Adventures in the Most Powerful Colorspace – it's practically the definitive book on Lab by the master of Lab himself.

Helen Bradley blogs atwww.projectwoman.com/phototips.htmland you can visit her website atwww.projectwoman.com.


8th December Meeting, Transport & Travel Competition

8th December Meeting

Come along to see the results of the Transport and travel competition.

The competition is kindly being judged by Gordon Quinn from Wetherby Camera Club.

Meeting Monday 8th December at 7:30pm at the HUGH RIPLEY HALL RIPON (Upstairs)

Ripon City Photographic Society Main Page Google Groups

Wednesday 26 November 2008

Pieve di Teco (Italy)


For further information on the proposed centre for photography in Pieve di Teco (Italy) please follow the link below:
Below is a link to my photographs, some of which may offer further insights into our area.
patrick malone
arcitalia.com

Tuesday 25 November 2008

Image Editing Tutorial - Focal Plane Effects


Image Editing Tutorial - Focal Plane Effects

Make everyday scenes look like tiny intricate models with this fun Photoshop technique

Click here to see the full tutorial


1st December Meeting, PAGB Review

1st December Meeting

Come along to see the PAGB - Review of last year's entry and discuss the club strategy for the Sharow Competition.

Meeting Monday 1st December at 7:30pm at the HUGH RIPLEY HALL RIPON (Upstairs)

Ripon City Photographic Society Main Page Google Groups

Monday 24 November 2008

Ripon Photographer's Award

David Morland , a member of the Ripon Photographic Society was this week made a Licentiaship of the Royal Photographic Society in Audio/Visual display. This is great honour and privilege for David as he had to take the appropriate examination in Audio visual by presenting a 10 minute display of his work before a panel of 6 highly critical judges who assessed every detail.
It has taken David two years to prepare his display to reach the high standard necessary to pass the examination. Now he can proudly use the letters LRPS after his name.

Jim Griffin

Ripon City Photographic Society Main Page Google Groups

Thursday 20 November 2008

24th November Meeting, The Animals of the Masai Mara by Andrew Linscott

24th November Meeting

Come along to see Andrew Linscott's lecture on "The Animals of the
Masai Mara"

Also don't forget to bring along your entries for Transport & Travel comp.

Meeting Monday 24th November at 7:30pm at the HUGH RIPLEY HALL RIPON (Upstairs)

Ripon City Photographic Society Main Page Google Groups

You are only as good as your last Backup


Its good to backup


Digital Photography School
Digital Photography Tips for You

You're only as good as your last Backup - Backup Tips and the Chance to Win a Hard Drive

By gtvone on From the Forums

G-TechWant to win a Hard Drive for Backing Up your Images? Read on to find out How.

Ever lost something that you loved? I have, I lost a necklace that my very first girlfriend gave me - I was fourteen at the time I think, All I remember is that she used to cry during "Listen to your heart by Roxette" I know, that's touching… Anyway, I lost the necklace that she'd given me for my birthday. I realize that I couldn't "Back that up" but I still remember how it made me feel…

Things that you can backup include your digital photos and the rest of the contents of your computer… These days drive space is cheap and easy to set up, but unless you follow some golden rules there is almost no point.

G-Drive Q

Erin from Fabrik dropped me an email with her ten points to a good backup for you all to try, I'll post them below.

Win a G-Drive Q 1TB

That isn't the only thing that Erin came up with, Oh No!..G-Technology have kindly donated one of their G-Drive Q 1TB external drives to us as a prize for this weeks DPS ASSIGNMENT. The topic for this week is going to be "Drive" You can translate that any way you would like, but to catch my eye you're going to need to be creative and trying your very hardest!

Here are Erin's ten tips to a decent backup…

1. Reliability - Select a storage solution that has a good reputation, and is built to last. For example, to ensure reliability, all G-Tech drives come in an all-aluminum enclosure (no plastic), which acts as a heat sink, keeping the drive cool. Heat kills drives.

2. Capacity – Select a drive with enough capacity so you have room to grow. Rule of thumb is to by 2x to 3x the amount of space you'll need.

3. Connectivity – Future proof your investment. There are many solutions on the market, such as the G-Drive Q 1TB that come with USB 2.0, FireWire 400, FireWire 800 and eSATA interfaces so you can be sure to connect with any system today, as well as in the future.

4. Local Backup Software – Mac users prefer to use Time Machine (it's a beautiful app and is very simple). There is a plethora of PC backup software tools available – Arcsoft, EMC Retrospect and more. Any of them will do fine. The important thing is to just do it.

5. Online Backup – For added protection, in case of fire, theft, or other natural disaster, it's wise to keep a separate copy of your most important stuff offsite, and available online. Solutions such as Fabrik Ultimate Backup offer 2GB for free of online backup space. If you want to upgrade, it's only $4.95 per month for unlimited capacity.

6. Develop a Backup Schedule - Good backup software will require you to set an automatic backup schedule once – on a day or time that's convenient for you; daily, weekly or monthly. You just simply set it and forget it. Rule of thumb, backup weekly at a minimum, or as often as you save/store important work or irreplaceable files to your hard drive.

7. Back up Everything - Today you can easily back up all of your hard drive data. No need to spend time sorting through every file or folder. Again, invest in a storage solution that's twice the size of your internal hard drive, to give your system room to grow.

8. Rotate Backups – Even though they're secure, some people are not comfortable using an online backup service. If this is the case, give yourself added protection. Use two drives and rotate one offsite. You should always, always, always have two copies of your most important stuff…did I say "always"?

9. RAID it – Solutions like the G-Raid Mini (it will ship w/RAID 1 later this quarter) or G-Safe solution provide RAID 1, mirroring. Whatever gets written to the first drive is automatically copied, or "mirrored," to the second, so if anything should happen to either disk, your data is still there.

10. Don't procrastinate – Unfortunately, the need to back up data is often a lesson learned from a bitter experience. Don't let it happen to you.

Thanks Erin!

I work in IT and (All jokes about a missing necklace and a bad eighties pop song aside) have seen "Disaster" happen, The company I work for, due to documented budget cuts wouldn't replace a piece of hardware, and as a result we had a massive failure of one of our nine tb disk arrays and lost just over a million documents, now, you may only lose a couple of hundred photos, but if you'd had that backup in place you would have lost nothing and you wouldn't have that sad face on!

G-Drive Q : Rear

Join us in the DPS FORUMS this week for the assignment and win yourself a fantastic, award winning G-Drive Q 1TB

Sime

Comments

Get email updates

AddThis Social Bookmark Button

Enter your email address:

Delivered by FeedBurner